Spiral Lone Star Quilt Class
Intermediate level quilting skills required:
Rotary cutting, accurate 1/4” piecing, paper foundation piecing
 Strip size: 2 1/4" – Finished center star size (tip to tip): approx. 33 1/2" inches Strip size: 2 1/4" – Finished center star size (tip to tip): approx. 33 1/2" inches
Finished quilt size: approximately 46" x 46"
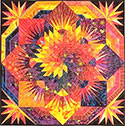
This design is guaranteed to spark excitement! Visually dynamic, this graphic show-stopper, is easier to construct than expected! The class will feature precision piecing techniques and design. Components are constructed with a variety of techniques including strip piecing, foundation piecing on freezer paper, and modified template techniques.
Knowledge of rotary cutting, strip piecing and foundation piecing is required!
| Supplies and tools: |
| |
Class text: Lone Star Quilts & Beyond book by Jan Krentz (order online, or purchase from local quilt shop) |
| Sewing machine & equipment: |
| |
sewing machine in good working order with bobbins, electrical cords, foot pedal |
| |
quarter-inch sewing machine foot |
| |
walking foot, other standard machine feet |
| |
plastic surround extension table for sewing machine with little legs (if applicable for your machine) |
| Sewing tools: |
| |
Assortment of needles – sharps, one ballpoint, sizes 70 or 80 / (10 or 12) plus one heavy size 16 (can be a used needle; for perforating paper) |
| |
fine .5 shaft glass-headed pins (important for precision piecing and blocking – treat yourself to a brand new package!) |
| |
Thread—medium value. Wind some bobbins with this thread before class. |
| |
Seam ripper, thread snips, stiletto, sharp scissors |
| |
stiletto or substitute (bamboo skewer, seam ripper, trolley needle, awl, hat pin, etc) |
| Rotary cutting equipment: |
| |
rotary cutting rulers: |
|
18" x 24" or larger cutting mat |
| |
3" x 18" (or similar 18" ruler) |
|
6" x 24" long ruler |
| |
12" x 12" (or larger quilter's square) |
|
rotary cutter with new blade |
| Ironing Equipment: |
| |
appliqué pressing sheet (if using specialty fabrics) or cover cloth |
|
Iron, ironing board (one per 3-4 students; may be provided by event) |
| |
Quilter's Cut 'n Press – 12"x18" pressing board or similar rigid pressing pad |
|
spray starch or fabric finish (optional if your fabric has good body. Required if your fabric is pre-washed and limp) |
| |
Empty pump spray bottle (to fill with water in class) |
|
|
| Office Supplies: |
| |
glue stick or Roxanne‘s glue baste-it (stick fabric swatches to fabric sheet and/or mockup)
|
| |
paper scissors |
|
3-ring notebook, blank paper, pen |
| |
transparent (clear) adhesive tape (NOT frosted "magic" tape)—(UK: cello tape ) |
|
Twin-tip Sharpie permanent marker, one or two colors
|
| |
double stick Scotch tape – can share with a friend |
|
Colored pencils, pencil sharpener (several colors to contrast with your fabrics) |
| |
small paper bag for trash
|
|
2-3 zip-lock bags (large) for small pieces |
| |
10 (ten)—11" squares freezer paper (includes 2 extra)
|
|
1 sheet—Template plastic (8-1/2" x 11" size OK) |
| |
stapler with staples—share with a friend
|
|
2—18" squares freezer paper (for the 4 triangular outer corners; may not be used in class)
|
| |
Painter's tape (to adhere design surface to the wall) OR 3M Command hooks with binder clips (the hooks work the best - see link at the bottom of the supply list)
|
|
Classroom & miscellaneous equipment:
|
| |
60" x 60" flannel, felt, flannel-backed vinyl tablecloth or quilt batting for design wall; your design in progress will be pinned and transported home on this flannel. Each student needs their own.
|
| |
heavy duty garage-weight extension cord
|
|
multi-outlet electrical "power strip" |
| |
project fabrics, precut into strips as recommended on fabric list. Bring all excess (uncut) fabric including optional fabrics you liked with you.
|
| |
camera – digital, phone or film
|
|
1 sheet fine sandpaper or sandpaper board (used under fabric when marking 1/4" seam allowances) |
| |
2 heavy rubber door-stops
|
|
seat cushion to provide comfort and elevate yourself on a folding or conference style chair |
| |
desk lamp or Ott light
|
|
|
|
Optional but recommended:
|
| |
safety pins (to secure fabrics to design wall surface for safe transport home)
|
|
PVC pipe table leg extenders or bed raisers – save your back! Another option is to bring your supplies in a rectangular case that can elevate your pressing pad and cutting mat
|
| |
Add-a-Quarter ruler – used for paper piecing (bring if you own one)
|
|
1–2 yds light weight fusible woven interfacing – only if planning to use lamé in the pieced design or foundation pieced sections
|
| |
Quick Quarter tool (transparent, colored, with slots)
|
|
Jan Krentz Teaches You to Make Lone Star Quilts DVD (helpful before and after class) |
| |
reading glasses
|
|
Advil, bandaids, water bottle, comfort items |
| |
Fussy Cutter 45 Diamond ruler; it would only be used for fussy-cutting specific fabric motifs on an individual basis. Classroom rulers will be available to try. If desired, available for purchase from Jan in class or at event. Contact Jan by e-mail if you have questions.
|
Fabric Requirements: The list below represents the color families I used. Please feel free to change your colors, and work from lightest (1) to darkest (8) values.
|
Paste Fabric Swatch here
|
Amount to purchase
|
Cutting directions
|
| 1 light – light (yellow) |
3/4 to 1 yard
|
(cut fabrics 1-8 in the following amounts):
1 – 11" square: cut first from yardage
6 strips – 2-1/4" x 42" (full width)
1 strip – 2-1/2" wide (to be used for foundation piecing)
(bring excess fabric to class)
|
| 2 light (yellow – orange) |
3/4 to 1 yard
|
|
3 light – medium (peach)
|
3/4 to 1 yard
|
| 4 medium – (peachy-red stripe) 5 medium – light (red-violet) |
3/4 to 1 yard
|
|
3/4 to 1 yard
|
| 6 medium – dark (red-violet wild print) |
3/4 to 1 yard
|
| 7 medium – dark (violet) |
3/4 to 1 yard
|
| 8 dark (navy w/ blue & green) |
3/4 to 1 yard
|
| 9 black (corner – background) |
1/4 yard
|
do not cut |
|
10 assorted shiny accent fabrics 8 colors – lamé (optional)
|
1/4 yard each
(full width if possible)
|
do not cut – optional purchase
|
| 11 binding & backing fabrics |
purchase later
|
N / A |
| 12 heavy muslin or cotton duck |
fat quarter
|
Do not cut; used for blocking cloth. Pre-shrink before class. |
HELPFUL HINTS with fabric selection – 3/4 to 1 yard each of eight fabrics, shaded from light to dark. You need sufficient contrast between the fabrics to see the spiral effect easily. For accent slivers, seen in the secondary diamonds, and scattered through the compass points: Add a small collection of unusual fabrics for shimmer and sparkle.
Please feel free to CHANGE the color families! The fabric colors in the list reflect those in the Spiral quilt, pictured in Lone Star Quilts. This design looks TERRIFIC in a wide variety of fabrics and color collections. Please select fabrics that appeal to you!
The Spiral design appears most vividly when some of the fabrics are "calmer" with less textural printed design and just 1-2 "busy" prints. If your fabrics all have visual texture, they will work only if there is a distinct value or color difference between fabrics that will fall next to one another.
NOTE – The fabric requirements are different than in the Lone Star Quilts & Beyond book, because I am encouraging you in class to make design choices. The book specifies ONLY the fabric enough to make the quilt AS IT APPEARS in the book. There is no extra fabric included for error or design variation.
NOTE – Specialty fabrics are challenging to work with, requiring patience and a cool iron. I recommend that skilled beginners work with cotton fabrics only, and intermediate–to–advanced quilters may try the specialty fabrics. Each of these materials has its own personality, requiring patience and care when constructing the quilt. |
Consider any of the following specialty fabrics: tissue lamé, silks, chiffon, satin, brocade fabrics, sheer ribbons, exotic trim pieces, etc. They are ideal for wall-hangings, but may be too fragile for bed quilts or garments.
NOT RECOMMENDED: Fabrics with a foiled surface—these may have a tricot knit backing. The foiled surface decoration is very heat sensitive. It is too fragile for extended use in quilts.
Bonus pages: Print for use after class: Seam Calibration pages; Drawing a Trapezoid unit (pdf); Lone Star Calculations—for star quilts of different sizes and layouts; Jan's compass pattern; simpler corner compass 1-page pattern; extra print-out of the Spiral Lone Star quilt schematic (two views); Bonus: Insert a Sliver of Color PDF
Preparation 2-4 weeks before class:
- Gather all supplies, tools and fabrics
- It is unnecessary to photocopy the compass (or rocket) blocks from the book.
- Label all tools with your name (use sticky address labels or a permanent marking pen, colored ribbons or tape)
- Make a color chart with the fabrics you plan to use: cut a narrow piece of each fabric; glue to the paper in order with a glue stick. Number the colors in your chart.
- Cut the squares and strips before class—take care to cut accurately. BRING ALL EXCESS FABRIC TO CLASS. This will enable you to make changes in your fabrics during design lessons in class.
- Bring alternate fabrics, too—if you were considering other fabrics and felt conflicted about the best selection, bring the extras, too. Do not cut the extra fabrics before class.
- Optional—pre-order the Lone Star Quilts book or DVD if you want extra input before class.
- Get a good night's sleep before class, because you are ready!
- Know the route to the classroom in advance, and come early enough to set up your sewing area before class begins. See you there!
Questions? Please contact Jan
Click here for fabric ideas and further information
Supply List Tips & Tools
back
|