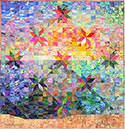
Colorwash Hunter Star

Fabrics: Note: Decide before class whether you prefer creating a small impressionist scene, or a simple Hunter Star design with traditional fabrics.
|
IMPRESSIONIST SCENE (1)
|
TRADITIONAL HUNTER STAR BLOCK
|
|
2/3 to 3/4 yard pre-printed scenic yardage:
- Press centerfold until the fabric is flat.
- Lay single thickness on the cutting mat
- Cut 10 strips, 2" wide in one direction, carefully controlling the ruler for minimal clean-up cuts
- Sub-cut the 10 strips into 2" squares (100 total) - DO NOT LIFT FROM THE CUTTING MAT
- Begin at the top of the first column. Pick up the 1st piece, move systematically downward, placing it over piece 2; stack 1-2 onto piece 3, etc. When all 10 from 1st column are stacked in order, place paper tag on the stack; use a needle & thread to stitch a large stitch to secure the stack together. Lable: row 1.
- Repeat for all 10 columns, stacking, labeling and securing together.
- Cut 32 or more solid or batik fabrics to CONTRAST with the scenic design – bring / cut different colors for best results (see example: Colorwash Hunter Star quilt.
|
32 or more - 2" squares from a prominent color (these will become the star points in your block - multiple colors/fabrics are recommended)
104 or more - 2" squares from a variety of fabrics (block background) You may cut scraps in a variety of colors, or groups of 8 squares from 13 different fabrics that coordinate with each other.
|
|
IMPRESSIONIST SCENE (2):
|
SCRAPPY COLORWASH STAR
|
- Cut one to four 2" squares from a large variety of fabrics ranging from light to dark. You will not need very many of each fabric because your scene will be created as you place different fabrics side-by-side.
- You may like to work with a photo to help inspire your fabric selection. Please bring this photo to class. Use it as a basic guide when selecting fabric prints, colors and values for your project.
- Cut more squares than you think you'll need - having extra squares provides more options to move pieces around selectiv
|
- Working from scraps or small pieces of fabric, cut a wide variety of prints, plaids, stripes and other cotton fabrics.
- Consciously select fabrics in two (or more) categories -
- block background, and
- contrasting star points
- Refer to the Fabric Ideas for inspiration. The squares are 1-1/2" finished size; small to medium scale prints, prints, tone-on-tone fabrics, small checks or stripes work well.
|
Colorwash Hunter Star Tools & Equipment
| Teflon appliqué pressing sheet OR piece of baking parchment paper (adhesives do not stick to these materials) |
large bath or beach size towel (larger than a small hand-size towel or washcloth) – to be used in class as a pressing surface for your design; the towel will likely get small amounts of water-soluble glue on it (glue washes out) |
| 1 spool thread – color to coordinate with your design, medium tone or value |
small travel iron (CHECK WITH EVENT sponsors – occasionally irons are provided, and personal iron use is restricted due to electrical issues in the facility) |
| 1 - 2 bobbins, wound in advance with coordinating thread |
fine, glass-head pins |
| fabric glue with very fine applicator tip – many options available today: Elmer's school glue with special tip, Roxanne's glue-baste it, Jill-lilly applique glue, etc. |
pen or pencil
3-ring notebook to hold handout (receive in class), photos, notes, supply list, etc.
|
|
scissors or thread snips
seam ripper, stiletto or bamboo skewer
|
small bag for trash
name tag with first name in LARGE PRINT
|
| cutting mat (travel size OK) if planning to cut some squares in class |
6" x 12", 6" square rulers |
| rotary cutter with sharp blade |
digital camera or phone camera strongly encouraged (to document your work & fellow classmate's designs) |
OPTIONAL ITEMS
| reading or sewing glasses |
portable light |
| long tweezers for grasping fabric squares and moving them |
Hunter Star Quilts & Beyond book by Jan Krentz - refer to pg 47 for Colorwash quilt. |
| chair cushion |
sack lunch or snack; water bottle or cool drink |
Click here for fabric ideas and further information
Supply List Tips & Tools
back
|


