Quick Broken Star - without Y seams
Fabric Requirements (click here for downloadable PDF of this supply list)
|
Yardage
|
For
|
Cutting for larger quilt
using the 6 1/2" 45º diamond ruler (optional prior to class)
58" square without borders; 64"-70" square with borders of choice.
|
Cutting for smaller quilt
using the 3" 45º diamond ruler (optional prior to class)
24" square without borders; 29"-32" square with borders of choice.
|
| 2 to 3 yds floral print * |
Diamonds |
Fussy cut 16–6 1/2" 45º diamonds |
16 – 3" 45º diamonds |
| 3 1/2 to 4 yds red-orange-yellow bold stripe |
Diamonds |
Fussy cut 16–6 1/2" 45º diamonds (feature the same stripe running lengthwise tip-to-tip in all diamonds) |
16 – 3" 45º diamonds |
| |
Border 2 |
Cut 8 – 4 1/2" x 42" border strips (selvage to selvage, or perpendicular to the stripe.) |
4 – 2 1/2" or 3" x 42" strips |
| 2 1/2 yards light pink polka dot |
Border 1 |
Cut 4 border strips, 2 1/2" x 66" (lengthwise, parallel to the selvage) |
4 – 1" or 1 1/2" x 42" strips |
| |
Background |
Cut 16 – 9 3/8" squares; cut once diagonally to yield 32 triangles |
Cut 16 – 4 3/8" squares; cut once diagonally to yield 32 triangles |
| |
Background |
Cut 16 – 6 7/8" squares; cut once diagonally to yield 32 triangles |
Cut 16 – 3 3/8" squares; cut once diagonally to yield 32 triangles |
| 3/4 yard fabric |
Binding |
Cut 2 3/4" strips to total 292" linear inches (bias or straight grain) |
Cut 4 – 2" strips for a total of approximately 128 liner inches(bias or straight grain) |
| 4 1/4 yards fabric |
Backing |
Join two widths for an adequate sized back. |
1 yard backing fabric |
| Batting |
|
76" x 76" (slightly larger than finished quilt) |
32" x 32" (slightly larger than finished quilt) |
* Fabric quantity varies depends upon the size and spacing of floral motifs, and number of repeats per yard in the design.
ONE DAY WORKSHOPS: Fabric selection is key to the quilt's striking appearance. Design options and fabric placement will be discussed, aiding in final selection and cutting. Basic assembly begins in the afternoon. Confident students may pre-cut their fabrics prior to class, although this is unnecessary. Cutting will also take place in class. Please bring alternative fabrics you may be considering for your project.
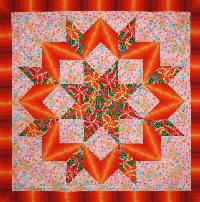
The Freckled Lily quilt features a large-scale printed floral, plus a coordinating bright stripe fabric which has been located in both the diamonds (fussy-cut to feature only the yellow-orange portion of the stripe) and the outside border.
Jan's Tips: Your quilt may feature a wide variety of fabrics, prints, batiks, etc. When cutting, you need a total of 32–45° diamonds, and may prefer to cut 4 groups of 8–45° diamonds, 2 groups of 16 diamonds, 8 groups of 4–45° diamonds, all 32 from different prints, etc. This quilt features a double border – the inner border matches the background (and is invisible in the photo).
I recommend a similar double border for smaller quilts, or a border print for either quilt (border width is determined by the print width).
Tools and Equipment
The following list may be daunting—FEAR NOT! Students in previous workshops have requested the items below for use in class. PLEASE MARK ALL EQUIPMENT WITH YOUR NAME
USE AT HOME TO PREPARE YOUR FABRIC:
| Rotary cutting acrylic rulers: 1 large square, 6" x 24" ruler and 6 1/2" 45° Fussy Cutter Diamond ruler (if you own one - otherwise you can cut the diamonds in class) |
| Glue stick or Roxanne's Glue Baste-it (bottle) (for swatches - optional - use on your color chart at home before class) |
| Colored pencils - for shading in colored areas on the quilt design schematic. Bring pencils to class. |
FOR USE IN CLASS:
| Quick Star Quilts & Beyond by Jan Krentz – text book for class (available for pre-order / purchase – $28 retail; CA sales tax applies within state of CA) |
| fast2cut "Fussy Cutter" 45º diamond ruler set (available for trial and purchase in class if desired) – excellent for "fussy cutting" motifs ($25 retail; CA sales tax applies within state of CA) DO NOT CUT with a 60° DIAMOND RULER. IT IS THE WRONG ANGLE. |
| fabrics for star and background – bring all fabrics, including scraps. Pre-cut if you are feeling confident. Wait until class if you would prefer to hear more suggestions. |
| Sewing machine with filled bobbins |
| Quarter-inch presser foot, standard foot, and walking foot if you own one (some machines do not stitch well with a quarter-inch foot. Switching to either of the other two feet can improve the quality of your stitching.) |
| Sewing thread to blend with fabric – medium shade (do not select hand quilting thread) |
| Size 10/12 (70/80) sharp, topstitch or quilting machine needles (not universal point) |
| Rotary cutter with new blade (45mm medium or 60mm large cutter size) |
| Self-healing rotary cutting mat (18" x 24") |
| Stiletto, skewer or similar tool |
Seam ripper |
Sewing scissors or thread snips |
Paper scissors |
| Sewing pins – glass ball head, fine .5 shaft pins are best for matching seams (preferred instead of heavy-weight quilting pins with plastic heads) |
|
Name Tag
|
pencil / pen for notes |
| 3-ring binder for supply list, paste-up & class handout sheets |
| 3-5 colored pencils for marking fabric / pencil sharpener / white or silver marking pencil for dark fabrics |
| Sharpie marker – fine and / or extra fine ("twin-tip" Sharpies are wonderful!) |
| Iron (in class, share 1 iron between 3 or 4 students) |
| 72" x 72" piece of flannel, batting or flannel-backed plastic tablecloth for design wall surface (strongly recommended) |
| 200-300 safety pins to secure project to flannel for safe transport |
| Heavy-duty 3-prong extension cord and power strip |
OPTIONAL SUPPLIES: (nice to have, not mandatory for class)
| 4 pieces – 1 1/4" PVC pipe, cut into equal lengths for table leg extensions (slip the pipes onto the tubular legs of a standard banquet table. The extensions elevate the table to a better height to eliminate back strain in class. I am 5'6" and my extensions are 11" high.) ALTERNATIVE: 4 bed raisers, sold in most housewares departments. |
| digital camera – optional but strongly recommended to be used as a design tool in class |
| reading glasses |
inflatable chair cushion |
Ott light or desk lamp |
|
| Please arrive and set up 30 minutes before class starts. I want you to get the most from your day, because I have lots of great information to share! |

Quick Broken Star coloring diagram
Permission granted to make several copies for personal use.
|
|
Optional Bonus pages; Print and add to your 3-ring class notebook:
|
Supply List Tips & Tools
back
|