Monet Water Lily Impressionist Quilt
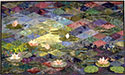
Create an impressionistic wall hanging reminiscent of Monet's Water Lily paintings. Students compose ‘textile paintings’ with a collection of fabrics and embellish with dimensional appliquéd water lily flowers and buds. Students bring a collection of fabrics for personal use, plus a limited number of fabrics to share in the class. (This creates a working palette of fabrics with a wide range of colors, textures and pattern creating a rich variation of fabrics to begin your composition).
Students are required to purchase a flower kit containing specialty fabrics for the flowers & buds in class. Each small package contains fabrics for a single flower color with stamens and other items. The kit fee covers two packages. Additional packages may be available for purchase at the end of class. The kits are not available for purchase by the public – they are for classroom use.
Class Text: Diamond Quilts & Beyond book by Jan P. Krentz (2005)
ONE-DAY class: Design work, includes cutting diamonds, begin laying out the diamond background. Flower assembly demonstrated; limited hands-on instruction for students to construct flower samples. No sewing in class.
MULTI-DAY classes: Design work listed above, plus additional days: Sewing diamonds, seam alignment instruction, constructing flowers, buds and lily pads on the background. Additional instruction covers quilting and finishing tips.
Finished size
Jan's quilt measures 48" x 30". Your Monet Water Lily quilt can be created in any size, depending upon your final desired use for the wall hanging. You may also make bed sized quilts from this design.
Fabric Requirements:
(also included on a checklist at the end of this document):
Shared fabrics in class: Each student will provide/share SIX different fat quarter pieces of fabric. Select only excellent quality cotton fabrics (please no discount store fabrics.)
You will use some of the shared fabrics in your own composition. The pieces you receive from fellow classmates will become the accent pieces in your quilt. The process provides students with a large collection of fabrics to begin design work in class.
Additional fabrics:
10 – 30 fat quarters to half-yard pieces from your stash
The additional fabrics are for your own design, and will create the overall theme of your personal quilt. When viewing your quilt, these fabrics will have the primary impact.
Fat quarters or full half yard pieces work better than narrow 9" x 44" cuts. Students frequently swap fabrics during class with each other. Do not worry that you are bringing the "wrong" fabrics – bring a collection of fabrics and we will work with them in class.
Small (4" x 7" or larger) pieces are suitable for single cuts to fill small areas.
TIPS: Look through your fabric stash, or purchase fabrics with the following characteristics:
Good quality 100% cotton quilting fabric. Your project benefits from using quality fabrics.
Select a mixture of colors within the same print (example: do not bring solid colors or prints with very little color change in the design). Select printed and dyed fabrics with the following visual patterns:
| mottled |
crinkled print |
wavy stripes |
painted appearance |
splattery |
| hand - dyed |
splotchy |
textural designs |
bubbly |
"weird" |
| batik |
irregular stripes |
wavy or watery |
swirly patterns |
tone-on-tone
|
For fabric examples: click here.
Color Palette
Monet‘s color palette was broad and exciting! You can see paintings in a full range of colors, since the water lily ponds reflect the sky, and the sky changes colors through out the day and season. Bring the colors you are most comfortable working with. The list below is only a general suggestion. You do not need to bring fabrics in each of the color families!
examples of paintings: click here.
Medium to dark shades
of any of the following colors represent water reflecting sky, foliage, and shadows of trees, etc.:
| greens |
grey |
deep forest greens |
russet |
coral |
| blue-greens |
grey-blue with tan |
midnight blue |
cinnamon |
gold burgundy |
| olive-greens |
green with tan |
black with brown |
bronze |
cocoa |
| teal blue-greens |
grey navy blue |
black with blue or green, etc. |
copper |
|
Light to medium shades
for highlights, reflected sunrise or sunset, etc.:
| pale greens |
light grey with teal |
pale pinks |
yellow |
| pale olive, sage |
blue-greens |
pale corals |
cream |
| pale blues |
pale peaches |
pale grey or tan |
ivory |
Fabric and Supply Checklist (print for convenience)
Students will receive a packet of supplies in class including instructional handout, stabilizers, fusible product, a flower kit, (optional to purchase additional colors if any remain at the end of class, $4 per kit), and classroom-use tools, threads and more.
One-day and multi-day classes:
- Diamond Quilts & Beyond book by Jan Krentz (class text)
- Monet painting photos or other images that inspire you
- 1-1/4 yard piece white polyester felt (approximately 72" wide), marked with diamond grid. Other fabric options: an acrylic blanket, flannel, flannel-backed plastic table cloth, batting. Pattern for marking felt – directions, below.
- 6 different good quality fat quarters of fabric to share with class (18" x 22", approx. size, mentioned previously)
- 10–30 fabric fat quarters (18" x 22", approx. size) to 1/2 yard cuts (18" x 44", mentioned previously)
- small pieces or quarter yard paper-backed fusible web
Rotary Cutting Equipment:
- rotary cutter with sharp blade (treat yourself to a new blade for cutting through many layers!)
- rotary cutting mat – largest one you can bring (you may tape two 18" x 24" together with duct tape to create a larger mat that will fold for travel)
- 6" x 24" – tape multiple rulers together to mark felt. Bring only one long ruler to class.
- 3" x 18" – please do not bring a 3 1/2" wide ruler. You will need a 3" width.
- Fussy Cutter Diamond ruler set (available through Jan or from your local quilt shop)
Tools & other equipment:
- ironing pad / iron (classroom set-up: one iron for 3-4 students)
- 100-200 safety pins to hold fabric shapes to the felt background
- 1 sheet template plastic (for water lily pads)
- paper scissors
- 3-ring notebook with supply lists. Will be used for class handouts.
- X-fine + Fine Sharpie® markers (used to mark the lines on the felt – is now also manufactued as a single pen with double tips at either end; bring pens to class)
- pen or pencil for notes
- 3-4 sandwich sized zip-closure bags (for small parts, flower pieces, etc.)
- 1 bottle of Roxanne‘s Glue Baste-it (available optional purchase in class - $8 per bottle.)
- wide painter's masking tape or 3m Command hooks & clips to hang design wall in class
Multi day classes only – additional equipment, bring if you have any, for use in class and at home when completing your design:
- Sewing machine with foot pedal, electrical cord
- presser feet: darning foot, open-toe embroidery foot & quarter-inch foot
- heavy duty extension cord and multi-outlet power strip
- thread in neutral color to blend with your fabrics – for piecing background.
- decorative threads to topstitch leaves and flowers (greens, peach, white, yellow, fuchsia pink, etc.) – rayon, polyester, silk, cotton, metallic – fine embroidery weight threads
- Metafil, Metallica or embroidery topstitching needles for the sewing machine
- thread snips
- water-soluble stabilizer such as Sulky® Solvy, Paper Solvy or new Super Solvy
- tear-away stabilizer such as Sulky® Tear Easy – approximately 12" x 12" piece
- water soluble sticky stabilizer such as AquaBond®, Floriani Wet 'n Gone Fusible Fibrous Water Soluble Stabilizer, etc. (Jan will try to have some available for purchase in class)
Optional (bring if you have at home):
- 5" or 7" spring hoop for machine embroidery
- reading glasses if needed
- Reducing glass (looks like a magnifying glass only does the reverse) OR a front door ‘peep hole’ viewer
- camera - digital or film (highly recommended but not mandatory!)
-
-
CLICK HERE to get the pattern for marking the felt or fleece for your design surface.
Directions (click for how-to photos):
- Open the felt or flannel, single layer. Lay it out on a table, smoothing out all wrinkles. Using the 22.5-degree template to set the angle, begin marking the felt with the Sharpie (or other permanent ink marking pen).
- Measure 2-1/2" distance between lines. Take time to be accurate. Mark diagonal lines in a parallel grid both directions, forming rows of diamonds. This task is easier and enjoyable with the help of a friend - each armed with a pen and marking the lines together.
The marked flannel or felt fabric will serve as the design wall and storage place for your diamonds while working on the project. It is useful for any of the Colorwash Diamonds designs.
Supply List Tips & Tools
back
|