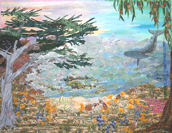
Diamond Landscapes Quilt
This class is a fabric study using 45° diamonds. You will be using a large number of fabrics (in small quantities) to create your own composition.
You will create an impressionist type scene or background using fabric diamonds. Enjoy working with luscious fabrics, creating a gorgeous field of color as you arrange fabric shapes in an impressionistic composition. Inspiring photos or fabrics can lead to interesting color compositions.
Study the beautiful landscapes seen in calendars, Impressionist paintings, flower gardens, rolling hillsides, the seashore at sunset, stormy skies, etc. The goal is to find an overall color theme that will inspire your fabric selection. In class, we will work with color movement, cutting the diamonds for a stable grain line, and construction techniques. You will bring a gridded piece of felt or flannel with you to class (prepared in advance).
Supply list: (click this link for a printer friendly PDF — does NOT contain linked pages)
20–50 different 1/4 to 1/2 yd pieces of fabric — look at fabrics in the following groups: (work with your own fabric stash and preferences) — Fat quarters or full 1/2 yard cuts are best to work with. From these fabrics, you will select SIX fat quarters (18" x 22" approximate size) to share with classmates.
- water-color type – batik, marble, gradations, hand-dyed fabrics
- texture type patterns – prints that resemble grasses, wood, sand, hair, swirly water, clouds
- ‘spotty prints’ – fabrics with background color and motifs of a contrasting color — florals, polka dots, whimsical animals or bugs, leaves, rocks, etc. These are blending fabrics — sometimes considered UGLY!
- plaids or checks with several colors
- medium-scale fabrics with several color families
- large-scale fabrics—harder to use, but could also work into the theme
- fabrics with a surprise "punch" of contrasting color
FABRIC SELECTION TIPS:
Select fabrics that share colors example: fabric #1 has blue with black; fabric #2 will contain either blue or black, plus a new color. Fabric #3 shares something in common with fabric #2, and so on. In this way, you can introduce new colors in a logical way, because the fabrics relate to each other. Click here to view the actual quilts!
Click here for fabric suggestions.
Basic Supplies
- Diamond Quilts & Beyond book
- white flannel or felt, to use as a pin-up design wall (48" x 60" or larger) – draw gridlines before class (see last page of this handout for grid instructions.
- Sharpie (or other permanent ink) marking pen (used for marking grid at home & used in class)
- yardstick or several 6" x 24" acrylic rulers, taped end-to-end (for marking grid at home —bring one 6" x 24" ruler to class)
- transparent package tape (used at home for rulers)
- safety pins—(200-300)
- landscape or floral photos that inspire you
|
- travel iron, pressing pad
- heavy-duty extension cord
- multi-outlet power strip
- 3-ring notebook (for class supply list & handouts), paper, pen
- cutting mat (18" x 24" or larger)
- rotary cutter with new blade
- acrylic rulers: 6" x 24"—3" x 18"
- masking tape or blue painter's tape (to hang up design wall in class) OR 3-M Command hooks with Binder clips (see notes, below)
- transparent adhesive tape for use in class ("scotch" tape in red packaging, not frosted magic tape in green packaging)
|
Sewing equipment, notions & tools:
- sewing machine, bobbins, foot pedal, electrical cord
- Presser feet for the sewing machine
- thread (medium value) to blend with fabrics
|
- quarter-inch presser foot
- thread snips
- seam ripper
|
Optional items:
-
3" and 6.5" 45° Fussy Cutter Diamond Rulers (available from instructor in class to test and for purchase if desired)—invaluable tools for this process. $25 per set of two rulers
-
reducing glass or door "peep hole" viewer
-
|
- camera - digital or film (highly recommended but not mandatory!)
- chair cushion
- reading glasses
- portable light
- personal fan (if workshop is in warmer climate)
|
Preparation for class:
- Collect the fabrics and supplies.
- Mark the grid lines on the felt or flannel. (directions) Work on a large dining room or banquet table. This task takes 45 minutes to 1-1/2 hours, depending upon your available work space and how quickly you work. (don't leave this task until the last minute!)
- TIP: Tape two acrylic rotary cutting rulers end-to-end with clear package tape. This will speed up the marking process. Remove the tape promptly to avoid adhesive build-up on the rulers.
- Study the inspiration photos and select fabrics that support and enhance the theme.
Multi-day classes – BRING the following equipment:
- sewing machine, 1/4" presser foot, bobbins
- power strip with multiple outlets & auto circuit breaker
- heavy-duty, 3-prong extension cord
- 3 different spools of thread (1 light, 1 medium, & 1 dark) to blend with fabrics
- thread snips, seam ripper
MARKING THE FELT for a DESIGN WALL directions
Equipment:
- Felt, flannel or flannel-backed plastic tablecloth
- 22.5-degree angled template paper (click to link to the pattern)
- yardstick or acrylic rulers
- optional – clear tape / package tape to adhere rulers end-to-end
- ‘Fine’ Sharpie permanent marker (this is heavier than the "Extra Fine")
Directions (click for how-to photos):
- Open the felt or flannel, single layer. Lay it out on a table, smoothing out all wrinkles. Using the 22.5-degree template to set the angle, begin marking the felt with the Sharpie (or other permanent ink marking pen).
- Measure 2-1/2" distance between lines. Take time to be accurate. Mark diagonal lines in a parallel grid both directions, forming rows of diamonds. This task is easier and enjoyable with the help of a friend - each armed with a pen and marking the lines together.
The marked flannel or felt fabric will serve as the design wall and storage place for your diamonds while working on the project. It is useful for any of the Colorwash Diamonds designs.
Note: I recommend securing the fabric diamonds to the surface with safety pins to avoid injuring yourself from use of straight pins (and possibly getting blood droplets on your project).
This material is available for students in Jan Krentz's Diamond Landscapes class only.
Additional Links:
Supply List Tips & Tools
back
|

