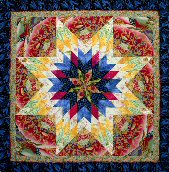
Love that Lone Star! (Lone Star Basics)
Intermediate level quilting skills required: Rotary cutting, accurate 1/4” piecing

Learn to sew a basic, traditional Lone Star quilt with Jan's foolproof techniques! Be adventurous with brilliant color or use this design as a "stash reducer" to incorporate those favorite fabrics on the shelf at home. Alternate quilt picture – click here.
Jan‘s class will cover design tips and offer suggestions for fabric placement. Select fabrics in colors similar to the ones Jan has used, or feel free to create your own dazzling color palette! Glue fabrics in the design paste-up, and pre-cut strips for the central star before class.
This class will feature strip piecing, cutting, pressing and discuss Y-seam techniques. Advance preparation for class. The supplies are necessary for class.
-
Basic knowledge of rotary cutting is recommended.
-
Advanced preparation for class is required.
-
Please print all supply list pages.
We are making a wall-hanging size quilt in class. Complete the design ‘paste-up’ and preview your design in the hinged mirrors. Achieve accuracy when cutting by folding the fabric neatly and always align the ruler from the fold when cutting strips.
Strip size: 2 1/4" Finished center star size (tip to tip): approx. 33 1/2" inches
Finished quilt size: approximately 46" x 46"
CLICK for PRINTER-FRIENDLY PDF SUPPLY LIST
CLASS PREPARATION BEFORE YOU COME:
- Pre-wash fabrics (if making a quilt you plan to wash)
- gather all tools, supplies & equipment
- cut fabrics and make your ‘paste-up’ diamond wedge –gluing fabrics into place. (we will use this design mock-up through the entire class, so you WILL need it. Frosted tape is not recommended to adhere the fabrics, due to poor visibility through the tape.)
- cut fabrics as indicated on the fabric chart – modify if you have changed fabrics in your design.
- Basic knowledge of rotary cutting and straight strip-piecing is required.
- The colors designated on the mock-up or paste-up are only a guide. Please feel free to adjust the location of fabrics until you are pleased with your design.
- You‘ll need one strip of fabric for EACH diamond on the paste-up.
- Please arrive and set up 30 minutes before class starts. I want you to get the most from your day, because I have lots of great information to share!
CLASS ACTIVITIES:
- Previewing the star to check for fabric placement (before class)
- Strip piecing techniques, including finding the 1/4" seam allowance on your machine
- Assembling strip sets (see pages 51-52, Lone Star Quilts)
- Cutting first strip sets into 45° diamond rows
- Piecing 45° diamond units - precision piecing methods introduced
- Blocking 45° diamond units
- Measuring 45° diamond units
- Cutting: setting squares (fussy cutting if necessary)
- Y-seam construction techniques discussed
- Quilting tips and suggestions
- Class completed.
FABRIC REQUIREMENTS & PASTE-UP SHEET
Select the prominent, large-scale print for the corner squares and coordinating print you want to use for the outer border. Working from the colors in those ‘focus fabrics’, select additional fabrics for the star.
Remember to VARY the SCALE of the prints you choose. You will like the fabrics if you have a variety of colors and contrast in the star, print, and outer border.
**It is a good idea to use the border & binding fabrics as one of the choices in the star. This helps the colors to flow from the center to the outer edges of your design. Be sure you have LIGHT, MEDIUM, and DARK colors in your selection.
All strips are full width (selvage to selvage). Paste your swatches in the column on the left, & also in the design paste-up sheet, below. This gives you a great idea of how your color placement will appear in the diamonds.
|
PASTE SWATCH BELOW
|
AMOUNT TO BUY
|
WHAT to CUT
|
|
1
|
fabric – interesting, pretty or dynamic design
|
1/8 yard
|
1 – 2 1/4" strip
|
|
2
|
complementary fabric
|
1/4 yard
|
2 – 2 1/4" strips
|
| |
3
|
complementary fabric
|
1/4 yard
|
2 – 2 1/4" strips
|
4
|
Companion to theme fabric – (select an interesting medium-to-large scale design)
|
2 – 2-1/2 yards (A)
3/4 – 1 yard (B)
|
1 – 2 1/4" strip
save the rest for trapezoids (quilt A) or border (quilt B)
|
5
|
complementary fabric
|
3/8 – 1/2 yard
|
4 – 2 1/4" strips
|
| |
6
|
complementary fabric
|
1/4 yard
|
3 – 2 1/4" strips
|
| |
7
|
contrasts with theme fabric #1
|
1/4 yard
|
2 – 2 1/4" strips
|
| |
8
|
strong contrast to the theme fabric
|
1/8 yard
|
1 – 2 1/4" strip
|
| |
9
|
Theme Fabric – Larger scale design
|
2 – 3 yards * (A)
1-1/4 – 1-1/2 yd * (B)
|
do not cut until class.
|
| |
10
|
muslin –for Blocking cloth
|
1/3 yard
|
12" x 22"
|
| |
11
|
Backing Fabric –coordinates / complements the whole quilt
|
measure finished quilt
|
Do not cut.
|
| |
12
|
Binding Fabric
|
3/4 yd
|
Do not cut.
|
Supplies, Equipment & Materials:
The following list may be daunting – FEAR NOT! Lone Star students themselves have requested the items below while working in class. PLEASE MARK ALL EQUIPMENT WITH YOUR NAME.
Class Text:
- Lone Star Quilts & Beyond book by Jan Krentz
Sewing machine, equipment & tools:
- sewing machine with bobbins, electrical cords, foot pedal, and extension table
- quarter-inch sewing machine foot
- walking foot, standard machine feet
- Assortment of sharp machine needles – sizes 70 or 80 / (10 or 12) – can be denim, top-stitch, quilting, sharp, embroidery (any needle with sharp point) – not universal or ball-point
- extra-fine .5 shaft glass-headed pins (important for precision piecing and blocking – treat yourself to a brand new package!)
- Thread – medium value to coordinate with project
- Seam ripper + thread snips
- stiletto or substitute (bamboo skewer, seam ripper, trolley needle, awl, hat pin, etc)
Rotary cutting & Ironing Equipment:
- rotary cutter with new blade
- 18" x 24" or larger cutting mat
- 6" x 24" ruler
- 12" x 12" or larger quilter's square ruler
- 3" x 18" ruler
- Pump spray bottle (fill with water in class)
|
- Quilter's Cut 'n Press – 12" x 18" pressing board or home made pressing surface
- full sized iron (one per 3-4 students) or personal travel iron
- spray starch or fabric finish (if fabrics are pre-washed or limp)
|
Office Supplies:
- glue stick or Roxanne‘s glue baste-it (stick fabric swatches to fabric sheet and/or mockup)
- 3-ring notebook, blank paper, pen
- paper scissors
- extra-fine Sharpie permanent marker
- colored pencils, pencil sharpener (for marking fabrics with 1/4" seam lines – just a few colors needed)
- transparent (clear) adhesive tape (red or purple labels – NOT frosted "magic" tape)
- large set quilter's design mirrors (or two 8 x 10 mirror panes, taped together with a duct tape hinge)
- 2 rubber door stops to tilt machine toward you in class
|
- small paper bag for trash
- 2-3 zip-lock bags (large) for small pieces
- fat quarter (18" x 22" approx.) 100% light colored cotton fabric - muslin or other fabric OK - for blocking cloth. Pre-wash or moisten and press with hot iron to pre-shrink.
- 10 – 11" squares freezer paper (includes 2 extra)
- 2 – 18" squares freezer paper
- Blue Painter's Masking tape (to adhere design surface to the wall) OR 3m Command hooks & clips
- 1 pc fine sandpaper or sandpaper board for applique work
- stapler – optional, handy
|
Classroom & miscellaneous equipment:
- 2 yds. flannel, felt, flannel-backed tablecloth or quilt batting for design wall (will use it in a 2-day class – optional for 1-day class)
- Electrical "power strip" & heavy duty extension cord
- fabrics, precut into strips as recommended on fabric list. Bring all excess (uncut) fabric with you.
- camera – film or digital (cell phone camera OK – please bring battery charger and empty or large memory card)
Optional equipment
- safety pins (to secure fabrics to design wall surface for safe transport home)
- Fast2Cut Fussy Cutter 45° Diamond rulers (can purchase from Jan in class or at the event)
- 1-2 yds lightweight fusible interfacing (only if planning to use loosely woven or specialty fabrics in the pieced diamonds or foundation-pieced sections)
- PVC pipe table leg extenders or bed raisers to save your back! (good item if you are taller than 5'5" or struggle with back pain)
- sewing awl or stiletto (if you own one)
-
Quick Quarter ruler (blue with slots)
-
Tilt'able (flat surface, raised at one edge for sewing machine) or 2 large rubber door stops to tilt sewing machine towards you (recommended)
-
cushion for your chair / for comfort and to elevate you for better sewing height.
Design Mockup

Bonus pages: Print for use after class:
Questions? Contact me. I'll see you in class! Jan
Supply List Tips & Tools
back
|