Quick Faux Diamonds

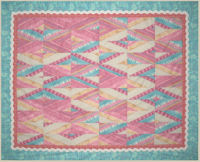
“Mosaic Tiles” Faux Diamonds quilt by Jan Krentz – 2008, 60” x 49”
Select one or more bold striped fabric(s) for the ‘faux diamonds’ in the quilt’s center. Add two coordinating prints for the pair of borders to finish the quilt – and, if desired, consider adding jumbo rickrack to the edge, as seen on the quilt above. During this workshop Jan will teach a special cutting technique to create these easy faux diamond shapes.
Additional design options include appliqué or surface embellishment to coordinate with and enhance the design.
Tip 1: Determining the finished size of your quilt: The more yardage in the piece of striped fabric, the larger the quilt will be. Two to three yards should yield a generous lap-sized quilt. Select stripes with an interesting collection of texture, or piece narrow bits of interesting fabrics to create your own stripe.
Tip 2: Create strip-sets from your stash if you can’t locate printed or woven stripes you like. Search through your fabric stash and create a collection of fabrics that work together. Add a “zinger” or unexpected color in very narrow strips. Sew up strips of various widths from ¾” (cut) through about 2 ½” (cut size). Make 2 identical sets of the same strip combinations – the overall width of the strip sets may be 8” to 16” wide for the biggest variety of faux diamond units. As you work, press the fabrics with spray starch, and press seams OPEN for best results.
Tool options:
Jan has created a specialty ruler (optional purchase) that you will find very useful when cutting your fabrics for this and other related designs. The same cut may also be achieved by adding tape to the bottom of your standard 6” x 12” acrylic quilter’s ruler.
FABRICS
Exceptions: loosely woven homespun, flannel, or heavy hand-woven stripes are not suitable for this process.
| 2–3 yards |
Striped fabric with an interesting group of color and shapes within the stripes (for a lap-sized or wall-sized quilt top |
| 1-1/2–2 yards |
Outer border – Companion fabric that coordinates with the stripes (this is a generous estimate, as we don’t yet know the finished size of your quilt). You may prefer to wait to purchase borders after the center is pieced. |
| 3/4 – 1-1/4 yards |
Narrow inside border (optional) – this is a generous estimate, permitting you to cut the border in one piece. If you don’t mind seams, you can make the inside border with much less yardage. |
| ?? yards |
Jumbo Rick-rack or other trim – purchase when you know the size of your quilt |
| ?? yards |
Backing fabric – purchase when you know the size of your quilt |
| ?? yards |
Batting – purchase when you know the size of your quilt |
Suggestions for successful stripe purchases appear on the Fabric Ideas page (link below). You will not find the exact fabric in the photo, but use this as a guide. Search for & purchase stripes with interesting variables – wide and narrow bands of color. Pattern is fun, too!
Tools & Equipment
| Sewing machine foot pedal & electrical cord, ¼” foot and walking foot (do not purchase one if you do not have a walking foot – but bring it if you own one) |
Clear acrylic sewing extension table (if you own one) or similar surface for machine |
| cutting mat – 18” x 24” or larger |
rotary cutter with sharp new blade |
| 24" x 6” or similar long acrylic rotary ruler |
Quick Diamond Quilts & Beyond book – Jan Krentz |
| 6" x 12" or similar shorter acrylic ruler (optional – purchase Stone Mosaic ruler, designed for this faux diamond design) |
seam ripper / stiletto (if you own one) |
| fabrics (see fabric supply list) |
scissors (fabric & paper) |
| Spool of thread – color to blend with your fabrics |
sharp sewing machine needles, size 10, 11, 12 or 70, 80, or 90 (quilting, denim, sharp, topstitch, etc – not ball point or universal needles.) |
| Bobbins – wind with thread before class |
extra fine .5mm shaft glass headed pins |
| 1-1/4 yard piece (approximately 72” wide) white polyester felt, or flannel, fleece or flannel-backed tablecloth to be used for a design surface. |
Safety pins – 100 to 200 to secure design pieces to flannel for safe transport home after class. |
| ironing pad, iron (event sponsor may provide irons – please verify in advance – irons may be limited due to electrical ) |
3-ring notebook to collect class supply list, handouts & eventually hold photos |
| Can of spray starch or fabric finish |
pen or pencil for notes |
| Multi-outlet power strip (check with event organizer to learn if this is provided) |
X-fine + Fine Sharpie markers (use for marking the lines on the ruler) |
Optional:
| Reading glasses if you use them |
Seat cushion |
| Luggage cart or small rolling suitcase for class supplies |
Bandaids, Advil or Tylenol |
| Digital camera or phone camera (for documenting your design in class) |
Small personal fan or light |
| Sack lunch (check with event organizer for lunch provisions) |
refillable water bottle |
Preparation before class:
- Gather tools and equipment – Mark all equipment & supplies with your name.
- If you prefer to work with pre-washed fabrics, you may do so.
- Whether working with pre-washed or un-washed fabric, ADD body and crispness with spray starch or fabric finish - iron smooth.
- Gently fold & roll fabrics over a hanger or rolled on a paper tube to minimize wrinking after you starch & press with an iron
NOTE: You are not making a quilt exactly like my quilt – you are making your own quilt. I can’t tell you how much fabric to bring, nor how large it will be. You will make those decisions as you work – and you’ll love the process!
1-2 yards will create a small project such as a table mat or runner.
2-3 yards will create a small wall hanging quilt
3-4 yards will create a small to medium lap quilt
If you have several coordinating fabrics that you like together, then bring all of them. Plan to arrive at least 30 minutes before class to get set up and we'll start promptly! See you at the workshop!
Click here for fabric ideas and further information
Supply List Tips & Tools
back
|


